How to Calculate the Best Table Size for Your Dining Room
ErikaWittlieb/CC0/Pixabay
Congratulations on your decision to get a new dining room table. Choosing a new style of table can change the whole vibe in your dining area. It's important to choose a table that fits the size of your room so there's room for everyone to walk around. Taking the time to measure the size of your dining room and comparing your open floor space to standard table sizes can help you choose a piece of furniture that's a good fit for your home.
Determine the Size of Your Dining Area
Hook the end of a tape measure to something solid against the wall, like the door trim, or have a helper hold the end against the wall. Measure all the way across the room to the opposite wall. Make a note of this size, and then repeat the measuring process on the other two walls in the room. Multiply the two numbers together to determine the size of the room in square feet. If you're choosing a dining table for a room in a house with an open floor plan, measure to the edge of the area where you want the dining area to end.
Draw the Room
Sketch the room on a sheet of grid paper or enter the dimensions in a 3D room layout planning tool. While a larger open space around the table gives a room a casual, airy feeling, allow a minimum of three feet around the perimeter of the room for walking space. The remaining space in the center of the room is the maximum to allow for a dining table. It's easier to fit a small table into a large room than it is to crowd an oversized table into a tiny room. If you have extra floor space available after placing your dining table, you can adjust the way it's positioned in the room to enhance the flow of foot traffic and increase visual appeal.
Consider Decor Elements Around the Room's Outer Edge
Some pieces of furniture are big enough they're hard to move, making them almost a permanent part of your floor plan. If there are other large furnishings around the outer edge of the room, such as a hutch or curio cabinet, be sure to include the dimensions of those items in your sketch and in your calculations.
The Role of Table Top Shapes in Choosing Table Size
This is a tip you may see at play if you look closely at tabletops for restaurants. This is because restaurant tables are often packed in snugly to provide seating for as many patrons as possible. When space is at a premium — for example if you have a small dining area and can't arrange it to leave floor space around the table — consider a round or oval table. The rounded edges of the tabletop can allow for foot traffic.
Consider a Table That Has a Leaf
Choosing a table that has a leaf is one easy way to accommodate an occasional large group while enjoying the coziness of a small table. Just add the leaf when guests are coming over and remove it when there's a smaller group present. Floor space may be tied up with the leaf is installed, but it's also freed up when you restore the table to its smaller leaf-free size.
1A 19th-Century English Extending Oak Dining Table
Buy Now $31,380.84
Made circa 1820, this "very unusual antique dining table" is made of oak covered with medullary rays. It's unique since mahogany was in fashion during the Regency period, and "the use of oak for construction of high fashion furniture was not common at the time." It also splits into two separate console tables.
2A 1970s Burr and Chrome Paul Evans Cityscape Extendable Dining Table
Buy Now $31,380.84
Designed by Paul Evans, this burr and chrome table can seat up to 14 people and was part of the designer's Cityscape Collection, a series that ran from 1971 to 1981.
3A Late 18th-Century Directoire Extendable Mahogany, Brass, and Gilt Bronze Table
Buy Now $31,378.43
This mahogany table from the Directory period can seat between 8 and 18 and can be extended up to 230 inches.
4"Half Moon," a Marble and Brass or Gold-Plated Dining Table Designed by Lara Bohinc
Buy Now $30,616
Slovenian-born designer Lara Bohinc offers "Half Moon," a dining table featuring marbles including black and gold, Verde Guatemala, Picasso, Calacatta, Red Wine, and Monclair, all framed by solid brushed brass or 22-carat gold-plated steel rims. It requires more than 100 hours of work and production takes 15 to 16 weeks.
5A Walnut Concave Dining Table
Buy Now $30,366.22
Dunleavy Bespoke designed this option in American black walnut, which is hand-sculpted into an elliptical concave form. Production takes 10 to 11 weeks.
Sam DangremondContributing Digital EditorSam Dangremond is a Contributing Digital Editor at Town & Country, where he covers men's style, cocktails, travel, and the social scene.
This content is created and maintained by a third party, and imported onto this page to help users provide their email addresses. You may be able to find more information about this and similar content at piano.io
Easter feels like a breath of fresh air after a long, snowy winter. Along with its religious significance to Christians, Easter is a celebratory time that ushers in a sense of positivity, joy, and much-needed cheer. But before it's time to open up gifts and dig into your ham dinner on Easter Sunday, decorate your house with pastels, fresh florals, and adorable accents fit for the holiday. To help you get started, we've found the cutest Easter decoration ideas, all of which are customizable and super easy to DIY.
Plan an Easter-inspired crafternoon and put your DIY skills to liven up your front door with an Easter wreath, transform ordinary eggs into pieces of art, and make a statement with colorful flower arrangements and centerpieces. You'll find that some of these ideas are more traditional, while others lean heavy on whimsy, color, and all things sweet (the Peeps place card holders, for example). So, if you really want to tap into all that this spring holiday has to offer, decorate your house — indoors and outdoors — with a mix of the traditional and the unexpected.
Mike Garten
1 of 60
Crinkled Leaves Wreath
Welcome guests and neighbors with this cheery wreath, made entirely out of hand-cut paper leaves.
Follow these step-by-step instructions to make the paper leaves:
Cut a square out of your paper and fold it in half, keeping the fold on the left.
Using your ruler and a X-Acto knife, create a triangle by cutting from the top left point to the lower right point.
Starting at the bottom of the triangle, fold about ¼" and flip it over to repeat until you've created an accordion all the way to the tip of the triangle.
Fold the accordion-folded paper in half and attach the two middle pieces together with a strip of double stick tape.
Repeat the above steps with different size leaves and paper colors.
Starting with the larger leaves, hot glue a few down on the bottom in different directions and layer smaller leaves on top. Finish it off by adding a few paper or faux flowers.
Mike Garten
2 of 60
Salt Dough Easter Eggs
Take a trip to your pantry to round up everything you need for this DIY. Once stamped and dry, hang them on your Easter tree, along your bannister, or strung across your mantel.
Follow this step-by-step:
Heat water until it's warm, not boiling.
Add 1/2 cup salt and 1/2 cup warm water to a large bowl. Mix until the salt is fully incorporated.
For colored dough, add a few drops of food coloring and stir until well combined.
Add 1 cup all-purpose flour and mix until you have a crumbly dough, making sure to break up large clumps with a spoon or your fingers.
Add 2 Tbsp vegetable oil and mix with your hands until incorporated. Form the dough into a ball and cover tightly with plastic wrap. Set it aside for about 10 minutes.
Lightly sprinkle your work area and rolling pin with cornstarch. Roll out the dough until it is about ⅛ - ¼" thick. Cut out egg shapes with a cookie cutter and make a small hole for hanging with a straw or skewer. You can press flowers, herbs, or leaves into the dough to create an impression.
Bake in a low oven (200ºF or lower) for about 2 hours or let air dry overnight. Once dry, paint the dough and hang it with ribbon.
Mike Garten
3 of 60
Pom-Pom Bunny Easter Eggs
The Easter Bunny may have come and gone, but these little bunnies will stick around from dusk to dawn.
To make, cut a 6" piece of pipe cleaner and fold it in half twice to create an "M" shape. Then twist the two ends of the pipe cleaner together to create bunny ears. Using craft glue, attach the ears to the back of a pom-pom to create a bunny head. Once dry, attach the pom-pom to the narrow end of an egg and let dry. Customize your bunny by adding a small bow tie with the ribbon of your choice.
Mike Garten
4 of 60
Origami Egg Cups
Set a colorful cup at each place setting to put your handiwork (a.k.a. decorated eggs) on display.
Follow this step-by-step:
Take a 6" square of origami paper and fold it in half to make a rectangle. Fold the paper in half again to make a square and then open it back out to a rectangle.
Take the right edge and fold to meet the center crease. Repeat on the other side before opening both sides back out.
Open out the side and collapse down to make a triangle. Repeat on the other side.
Fold both edges to meet in the center. Fold the bottom right corner up to the center. Repeat and fold the bottom left corner up to the center crease to make an upside down triangle.
Flip the paper over and repeat step 4.
Fold the top triangle up to meet the top of the paper. Flip the paper over and repeat on the other side.
Open out from the bottom to make the base and press down in the middle to form the cup. Place your egg in the cup and display.
Mike Garten
5 of 60
Accordion Paper Flowers
Scatter these paper flowers across your dinner table or hang them on a blank wall for a cheerful display.
Once you download the templates, follow this step-by-step:
Cut out 4 pieces of yellow or white paper (depending on what color daffodil you would like) using the first template.
Fold the paper in half both vertically and horizontally and open again. Fold the bottom up about ¼" and crease it down.
Flip the paper over and fold all the way to the top until you create an accordion.
Fold the accordion-folded paper in half and attach the two middle pieces together with double-sided tape.
Repeat steps 2-4 with the remaining 3 pieces of paper.
Connect all 4 together with a strip of double stick tape to create a flower shape.
Cut out a rectangle of orange paper about 2" x 1.5" and cut little points on one of the long edges.
Roll the rectangle loosely to make a tube shape and connect with a small piece of double-sided tape, folding the bottom edge down to create a flat bottom. Glue the little cup you made into the center of the flower to finish your daffodil.
Mike Garten
6 of 60
Easter Egg Candies
These decorations work double duty: Once you fill a plastic egg with treats and wrap it like a bonbon, affix a label to the outside with holiday-specific words (think: Easter bunny, carrot, and jelly bean). Then encourage party guests to scour your house for eggs and act out whatever's written on the outside of their egg, similar to a game of charades.
SHOP PLASTIC EGGS
Mike Garten
7 of 60
Sprinkle Easter Eggs
A spoonful of sprinkles gives plain eggs a multi-colored effect. First, get your work space ready: Make sure you have a clean empty egg shell or a faux craft egg, along with a shallow bowl or plate full of nonpareil sprinkles. Brush about 1/4 of the egg with a generous amount of Mod Podge and use a spoon to sprinkle nonpareils onto the wet glue. Let dry thoroughly before moving on to the rest of the egg. For the best results, allow the eggs to cure completely overnight before using them to decorate.
Mike Garten
8 of 60
Eggshell Garland
Here's proof that Easter eggs have limitless decorating opportunities. To make this adorable garland, hot-glue ribbon around the outside of clean shells with the tops cracked off. Then place a wet piece of floral foam inside each and push in a few short stems. Hang a handful along a string in front of a blank wall or window.
Mike Garten
9 of 60
Bunny Tail Place Setting
Play into the fun that Easter brings with these bunny-inspired place cards. Make a cardstock circle for each guest and write their name in bold, black letters. Glue on a pom-pom bunny tail and criss-cross two faux flowers to create cute bunny ears.
Mike Garten
10 of 60
Pipe Cleaner Easter Eggs
If you couldn't get your hands on an egg dyeing kit, you're in luck: This less-mess option only requires a handful of pipe cleaners and hot glue.
Before you start wrapping, make sure your egg is completely empty and clean, or pick up a bunch of craft eggs to decorate. Then attach one end of a pipe cleaner (you'll need 3 to 4 in the same color) to the top center of the egg with a small dot of hot glue and let dry. Carefully coil the pipe cleaner around the egg, adding small dots of hot glue as you go. Snip off any excess pipe cleaner once you have reached the bottom of the egg and secure the end with one last dot of glue.
Mike Garten
11 of 60
Easter Egg Tree
You don't have to wait until Christmas to decorate a tree — here's proof.
Gather sturdy branches — flowering quince, pussy willow, cherry blossom, magnolia, dogwood, or forsythia — and place them in a heavy vase. Round up a dozen or so blown-out eggs or faux craft eggs. One by one, attach a 20" piece of thin ribbon to the bottom of the egg to the midpoint of the ribbon. Wrap the ribbon around the egg and attach to the top of the egg with hot glue. Once dry, tie the eggs onto the branches and trim excess ribbon.
RELATED: How to Properly Decorate an Easter Tree
Mike Garten
12 of 60
Colorful Candleholders
Transform leftover dyed eggs into bright, colorful candleholders. Scatter a few across your dining table or even atop your mantel for a fresh take on Easter decor.
BUY TEA LIGHTS
Mike Garten
13 of 60
Woven Vase
While they're made with spring in mind, these handmade vases work well into the summer months. Cut a piece of cane webbing to fit around a glass hurricane vase. Thread a needle with contrasting yarn or embroidery thread and stitch a line or criss cross pattern along the edges of the cane webbing. Wrap the webbing around the vase and adhere with hot glue.
RELATED: 23 So-Pretty Easter Flowers and Centerpieces
Mike Garten
14 of 60
Bird's Nest Wreath
A nod to the season, this wreath brings together pastel colors, dried flowers, and bird's eggs. Start by wrapping a foam wreath form with burlap. Use a hot glue to attach blown-out eggs, broken egg shells, quail eggs, feathers, dried leaves and flowers to the wreath, overlapping until the entire form is covered.
MIKE GARTEN
15 of 60
Egg-ceptional Wreath Centerpiece
Save paper egg cartons and give them new life as a chic centerpiece. Cut out egg cups in groups of four and paint them white. Then arrange them in a circle and fill with eggs, flowers, or candy!
MIKE GARTEN
16 of 60
Bunny Box
Bunnies of all shapes and sizes are a staple for Easter. Create this simple DIY inspired by our furry friends, complete with fluffy ears and a cute pom-pom tail.
MIKE GARTEN
17 of 60
Paper Flower Decorations
Bring spring into your home with these dainty paper blooms that will last the whole season. First, fold dyed cupcake liners (or use colored ones) in half and cut out petal and fringe shapes. Then fold a piece of floral wire in half and twist around the faux flower stamen. Poke the wire through the center of three to four paper liners. Finish it off by wrapping floral tape around the base of the liners and continue to wrap down the "stem.
Mike Garten
18 of 60
Polka Dot Eggs
One extra step (adding dots with puffy paint) transforms basic dyed eggs into an eye-catching decoration. Pro-tip: For colors that pop, mix 1 tsp of vinegar per one cup of warm water, adding 10 to 20 drops of gel dye.
Mike Garten
19 of 60
Threaded Grapevine Wreath
MIKE GARTEN
20 of 60
Napkin Bunny Ears
Easter decorations can be bold and bright or subtle and elegant, like these napkin bunny ears. First, fold a napkin in half to make a triangle, then roll into a long strip and fold in half again. Thread a six-inch pipe cleaner through a bead and secure around the napkin. Insert three 3" pipe cleaners through the beads as whiskers.
Mike Garten
21 of 60
Easter Bunny Bags
If you're going to send them home with leftovers, you might as well make 'em as festive as possible. Cut paper bags to make bunny-ear shapes, then draw on an adorable bunny face. Don't forget the pom-pom tail!
Mike Garten
22 of 60
Eggshell Mosaic
Did you accidentally break one of your beautifully dyed eggs? Don't stress! Using craft glue, attach the broken pieces onto a plain egg in an artsy mosaic motif.
Mike Garten
23 of 60
Glass Jar Vase
Give your floral centerpiece some rustic flair. To make, bundle a half dozen milk jars with colorful string or twine, and then fill with your favorite blooms.
SHOP MILK BOTTLE SET
Mike Garten
24 of 60
Egg-Lined Shelves
Sprinkle Easter decor throughout your home — bookcases and cabinets included. The choice is yours: Place decorated eggs on porcelain stands, napkin holders, wood craft rings, or even paper cupcake liners for extra oomph.
BUY PORCELAIN STANDS
Mike Garten
25 of 60
Quick Spring Chicks
Unleash your inner artist with these sweet spring chicks. Just add some wings, a beak, and feet with a fine-tipped permanent marker, and you're set!
Mike Garten
26 of 60
Woven Coasters
Make 'em for Easter and then use them all season long. To make a coaster, cut a 5" square of burlap. Use a needle to carefully remove the threads around the edge of the square to create a fringe texture. Thread the needle with a contrasting yarn or embroidery thread and stitch a line along the sides of the burlap.
Mike Garten
27 of 60
Herb Garden Centerpiece
Why have one flower vase for your Easter spread when you can have a dozen? Transfer plants — succulents, greens, or fresh blooms — into painted pots wrapped in embroidery thread. Arrange the pots on stacked cake stands for a standout table topper.
Mike Garten
28 of 60
"Sugared" Eggs
Add extra sparkle to your dipped and dyed creations with this clever decorating trick. Paint one half of an egg with craft glue. Sprinkle with clear iridescent glitter and let dry. Repeat on the other side.
Mike Garten
29 of 60
Table Setting Nest
Create a spring-inspired table setting by making faux-grass nests and placing decorated eggs inside. A bright bouquet completes the look.
The Inspired Workshop
30 of 60
Easter Gnome
While classic and cute, Scandinavian-inspired holiday gnomes are one of the buzziest holiday decorations out there. Embellish your mini bearded figurine with pom poms, felt flowers, or other holiday-appropriate accents.
Get the tutorial at The Inspired Workshop »
Advertisement - Continue Reading Below
Caroline PicardHealth EditorCaroline is the Health Editor at GoodHousekeeping.com covering nutrition, fitness, wellness, and other lifestyle news.
Amanda GarrityAssociate Lifestyle EditorAs the Associate Lifestyle Editor for GoodHousekeeping.com, Amanda oversees gift guides and covers home, holidays, food, and other lifestyle news.
This content is created and maintained by a third party, and imported onto this page to help users provide their email addresses. You may be able to find more information about this and similar content at piano.io
Offering San Diego, Palm Springs, and Los Angeles the finest live edge walnut tables on the market. The artist prides himself in producing simple designs which let the material do the talking. Each table is custom made to order using the world's finest reclaimed walnut wood slabs, Italian stone, American steel, and tempered starphire glass.
Above: Custom Live Edge Bastogne Walnut Table built for a private residence in Palm Springs.
About
Furniture Artist
Kristopher Kirkpatrick
Specializes in high-end residential furniture commissions and art installments.
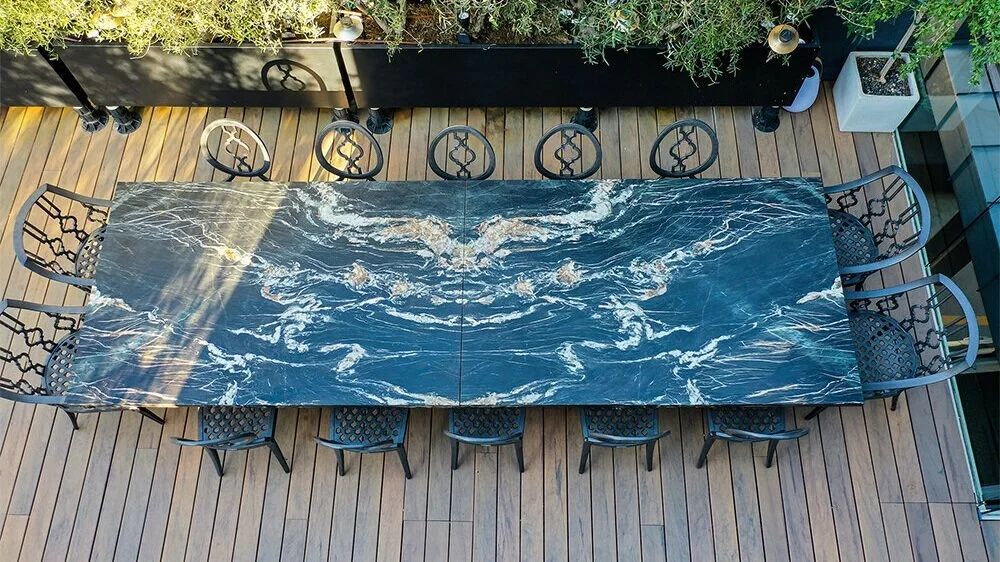
Above: Stone patio table installation in a Santa Monica private residence for outdoor entertaining.
Kristopher specializes in creating one-of-a-kind dining tables made from the finest reclaimed walnut in the world.
An unmistakable product, hand-made by the artist every step of the way.
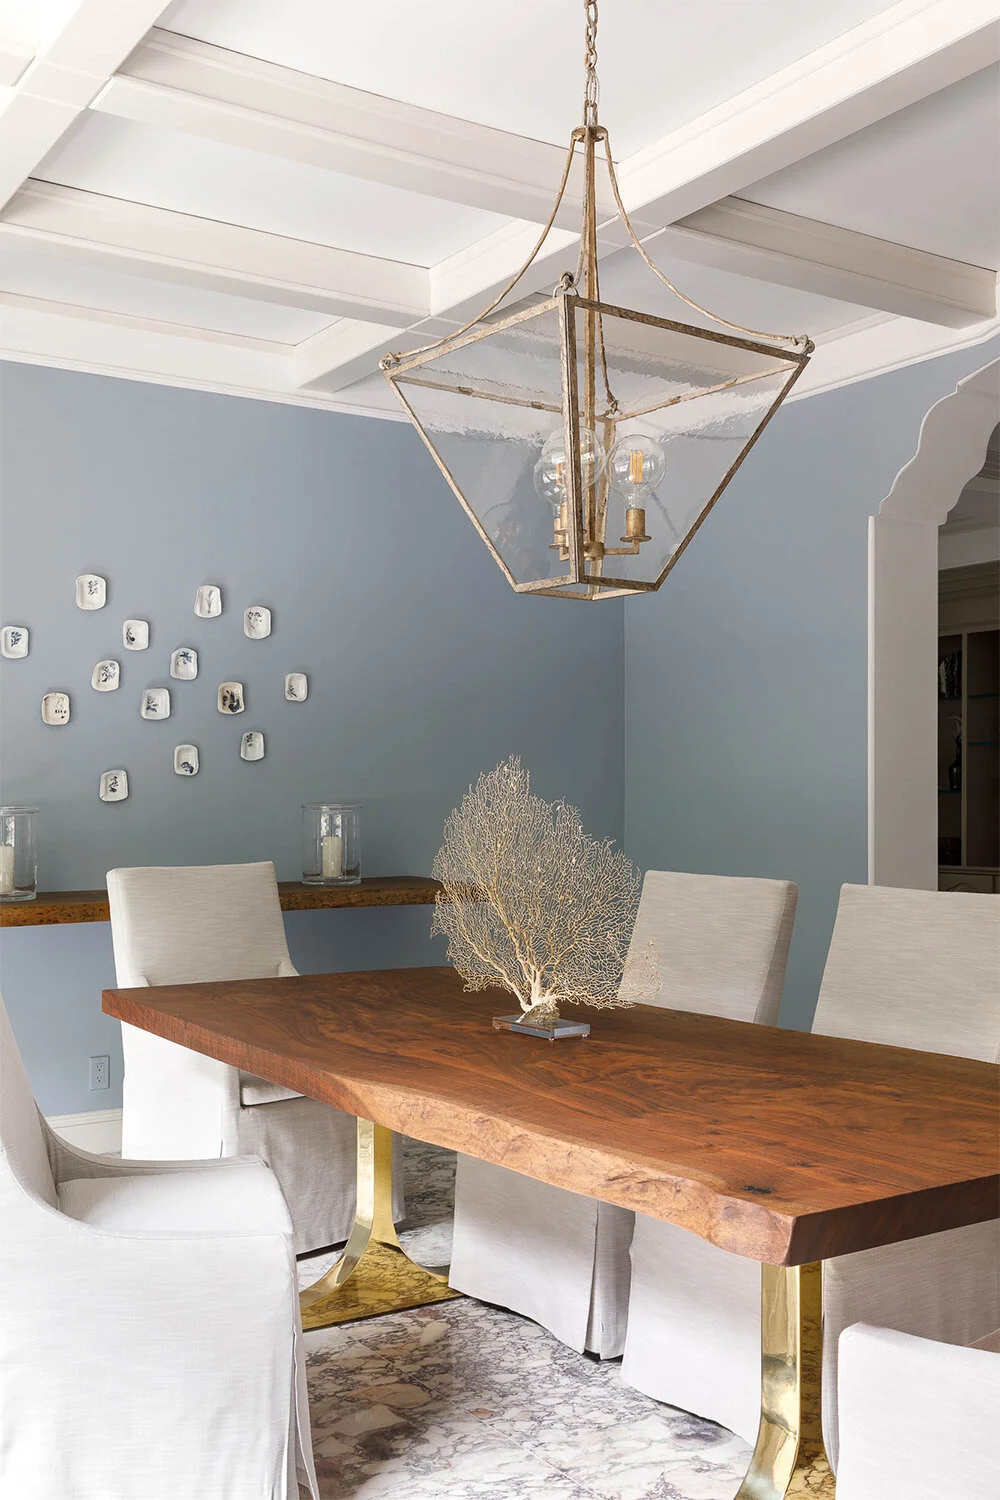
Above: Live edge claro walnut dining table installation in a Pacific Palisades private residence, featuring brass wishbone legs.
Clean lines and simple designs are
the signature attributes of a Kristopher Kirkpatrick table.
Each slab of live edge wood is sourced from the highest quality procurers of reclaimed, kiln-dried timber in the world.
Above: Live edge claro walnut table top fashioned from a single slab of reclaimed northern California walnut for an L.A. private residence.
"You cannot create a quality product without quality material"
— Kristopher Kirkpatrick
Kristopher's stone collection is imported from Italy and fabricated in San Diego, CA.
Table bases are custom made from premium American steel and powder coated for longevity.
Above: Stone patio table installation in a Santa Monica private residence for outdoor entertaining.
"Your custom base options are limitless.
If you can dream it, I can build it."
— Kristopher Kirkpatrick
A handmade piece by Kristopher Kirkpatrick is sure to be the focal point of any room.
Above: San Diego Furniture Artist Kristopher Kirkpatrick
" I'm a one-man outfit well known for letting the material do the talking.
I take tremendous pride in the products I produce and the relationships cultivated along the way."
— Kristopher Kirkpatrick
The Material
It's more than just wood, it's world renowned timber.
Kristopher specializes in California grown Claro Walnut and Bastogne Walnut.
Each slab is 100% reclaimed deadfall sourced along the western coast of the United States.
Every slab of live edge wood is hand cut, stacked and air dried for 1-3 years before entering a drying kiln.
This time intensive process kills any and all insects that may be living inside of the wood.
The process also stabilizes the slabs reducing their natural tendency to warp, cup, crack, and split over time.
"I know of no other table produced by any other craftsman which costs so much to dry and age.
The meticulous aging process produces a stability and workability you will find in no other table at any price."
— Kristopher Kirkpatrick
Often imitated, never replicated. A piece by Kristopher Kirkpatrick is sure to be the focal point of any room.
Functional Artist
The artist utilizes principles of visual tension to create striking one-off pieces, showcasing the vibrant patterns and textures found within each piece of wood.
San Diego-based artist Kristopher Kirkpatrick is known for producing some of the world's finest live-edge furniture. Specialized in custom furniture, live-edge tables, stone tables, and resin river tables, Kristopher's work stands out due to the quality of his material and design.
Not only are his designs highly innovative, but he uses the finest walnut, maple, and redwood in the world. His timber comes from reclaimed trees found along the Western Coast of the United States. Each log is hand-selected, milled, stickered, stacked, and air-dried for 1-3 years before entering a drying kiln.
His stone is sourced from a premiere supplier in Italy, and his food-safe epoxy resin is made right here in the U.S.A.
This process drastically reduces the weight of each table, kills critters that may be living inside of the wood, and stabilizes the slabs in order to prevent cracking, cupping, warping, and other nuisances associated with raw wood.
Only once this time-intensive process has taken place is a live edge wood slab deemed viable for a Kristopher Kirkpatrick table.
Offerings
Explore Kristopher's collection of wood, stone, glass, and epoxy dining tables.
Explore Kristopher's collection of wood, stone, glass and epoxy coffee tables.
Explore Kristopher's collection of walnut, maple and redwood tables.
Explore the limitless possibilities Kristopher's stone tables have to offer for both indoor and outdoor entertaining.
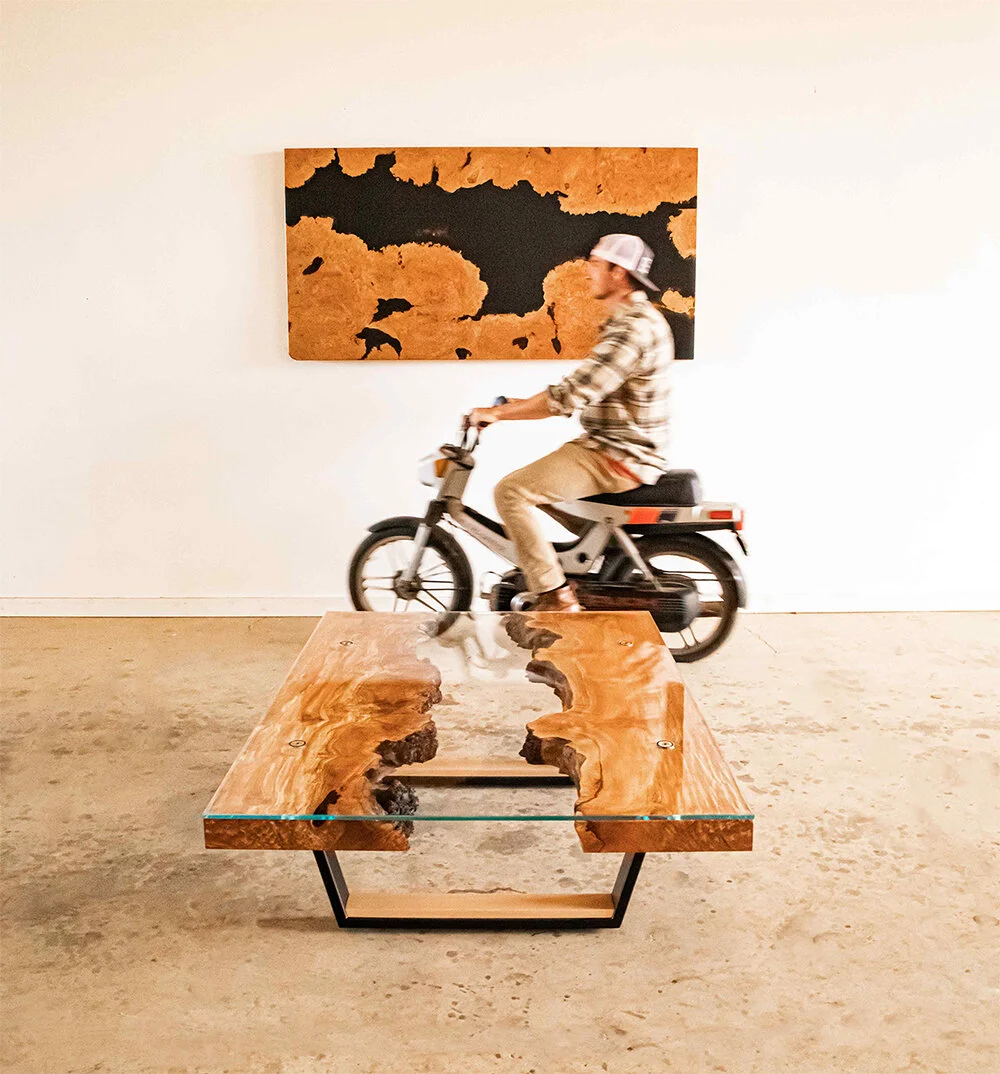
From resin river tables to casted wood tables, the possibilities with Kristopher's epoxy resin tables are limitless.
Explore Kristopher's collection of river tables.
Explore Kristopher's collection of live edge tables.
"With an emphasis on both form and function The end result should look effortless, As if a tree just happened to grow into a table."
— Kristopher Kirkpatrick
Join the blog!
Be the first to join my blog! Lot's of exciting content coming soon.
What, Where, & Why?
What: Kristopher is a highly specialized furniture artist offering custom tables made from the world's finest live edge wood, stone, and resin.
Kristopher and Admiral Butters strike a pose with a 150 year old slab of reclaimed Claro Walnut, before turning it into a dining table!
Where: The operation is located on Kristopher's 20-acre ranch in North County San Diego. Situated amongst picturesque flower fields, grazing horses, and the Palomar Mountain range. The infamous 4,000sqft barn is not only his workspace but his constant source of inspiration.
Kristopher puts the finishing touches on his Blue Water Resin Table (photo circa 2017).
Why: Experience and quality; the two things Kristopher has that 90% of his competition is lacking. Kristopher was classically trained in live edge table making under Northern California Redwood Burl legend Jim Parodi.
Having downloaded 50+ years of burl wood experience and having access to the finest purveyors of kiln-dried timber in the world, put Kristopher in a class of his own.
This extremely rare slab of reclaimed Pacific Burled Maple was transformed into a one-of-a-kind wall hanging for a private residence in Lafayette, CA.
Handcrafted in San Diego, CA
This is a private studio located in North County San Diego
. Complimentary shipping within the U.S. included with purchase unless otherwise noted. International shipping available upon request.